- Get link
- X
- Other Apps
- Get link
- X
- Other Apps
What Are Conditional Tags?
Conditional tags are the way you tell Blogger "what' to display and 'when' to display it. For exampleit's your way of saying "Display the Blogger Header" WHEN somebody is looking at the HomePage, but don't "Display the Blogger header' WHEN they are on the "About Me" page. Take a look at this site. See how the image on the homepage doesn't show up on the other pages? I'm going to tell you how I did that.
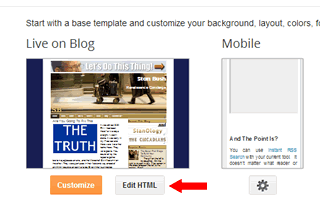
Open The Template HTML
 One of the things about creating these conditional tags is that they must have starting and ending statements. In other words every starting statement of <if> must have an ending </if> at the end of the condition. What we are going to do is tell the application that "If this is the homepage do THIS", if it's not, then do this. In blogger, the homepage's codespeak is data:blog.homepageUrl. So let's open your HTML Page figure out what needs to be changed.
 Easily Find The Widget
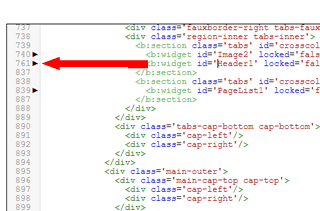
Use the Drop down menu and go to "Header1" since that is the "header widget". You'll probably see a lot of widgets in your list. Some of the names will make sense, some will not. Don't be afraid to use this technique on any of them. Just be sure that you've backed up the site first. And once you find the widget, you have to find the areas that are 'includeable' for that widget. Widget's are assigned 'id's, so the area that you want to enclose your <if> and <if> brackets is always right after one ID and before the next widget ID. You're only going to see those after you open up the Widget Code.Open Up The Widget Code
 Look to the left of where your cursor stops after you click the 'jump to Widget' menu. You'll see arrows that tell you where to click and open the code. Please make sure that you have your template backed up. You may need more than one try at this, and you must be able to get back to a good solid template. Once you open the code you'll be able to see the lines below. You're going to have to change both these areas before you try to save your work. If you don't, your sure to get an error.
Find This
<b:widget id='Header1' locked='false' title='Stan Bush (Header)' type='Header'>
<b:includable id='main'>
And paste this beneath the <b:includeable id='main'> line
<b:if cond='data:blog.url == data:blog.homepageUrl'>
So that it looks like this:
<b:widget id='Header1' locked='false' title='Stan Bush (Header)' type='Header'>
<b:includable id='main'>
<b:if cond='data:blog.url == data:blog.homepageUrl'>
The next thing you want to find is the line that looks like this:
</b:if>
</b:includable>
<b:includable id='description'>
And change it so it looks like this:
</b:if>
</b:if>
</b:includable>
<b:includable id='description'>
That Should Do It!
Once you've done this and saved the file, you should be able to go to the main page of your site and see the header. If you click on any other page, then the header shouldn't be visible. I've created a video to show you the steps as well. If you need help, please ask. If you'd prefer to have someone do it for you, we can do that as well.How Else Can You Use This?
Did you notice that to navigate this site I have created a simple "Who, What, When, Where, How, and Why" Menuing system? Look to the right of each page and you'll see a different menu for each of those pages. I used this method to change the pages of which menu showed up on what page. There are plenty more uses for this method, I hope this helps you!
.png)


Comments